 twinbfield

Theremin 1 - Ultrasonic sensor
by twinbfieldPermalink
I designed and implemented a theremin using an Arduino with an ultrasonic sensor.
There is a wonderfully ethereal instrument called the theremin that is played without touching anything. Built using two antennas (one for volume and one for pitch), it creates a synthesized wave that sounds otherwordly:
The original instrument is designed as a large capacitive sensor. As the distance between your hand and a charged conductor changes, it changes the frequency of an oscillating circuit. However, since the 1920s when the theremin was invented, there are many different ways to create a theremin that incorporate modern sensors and microcontrollers. Theremin World has dozens of designs.
In this next series of posts, I want to explore three theremin designs. First, I will use an Arduino and an ultrasonic sensor to measure distance and produce a pitch-only theremin. In future posts, I hope to create a "true" theremin based on capacitive sensing, and finally one using circuits only with no microcontroller (if I am brave enough).
Materials and design
For this project, we need the following:
- Arduino (I used an Uno)
- HC-SR04 ultrasonic sensor
- 3W 8Ω speaker
- LM386 amplifier board (not just the raw LM386 chip)
- Various jumper cables and a breadboard
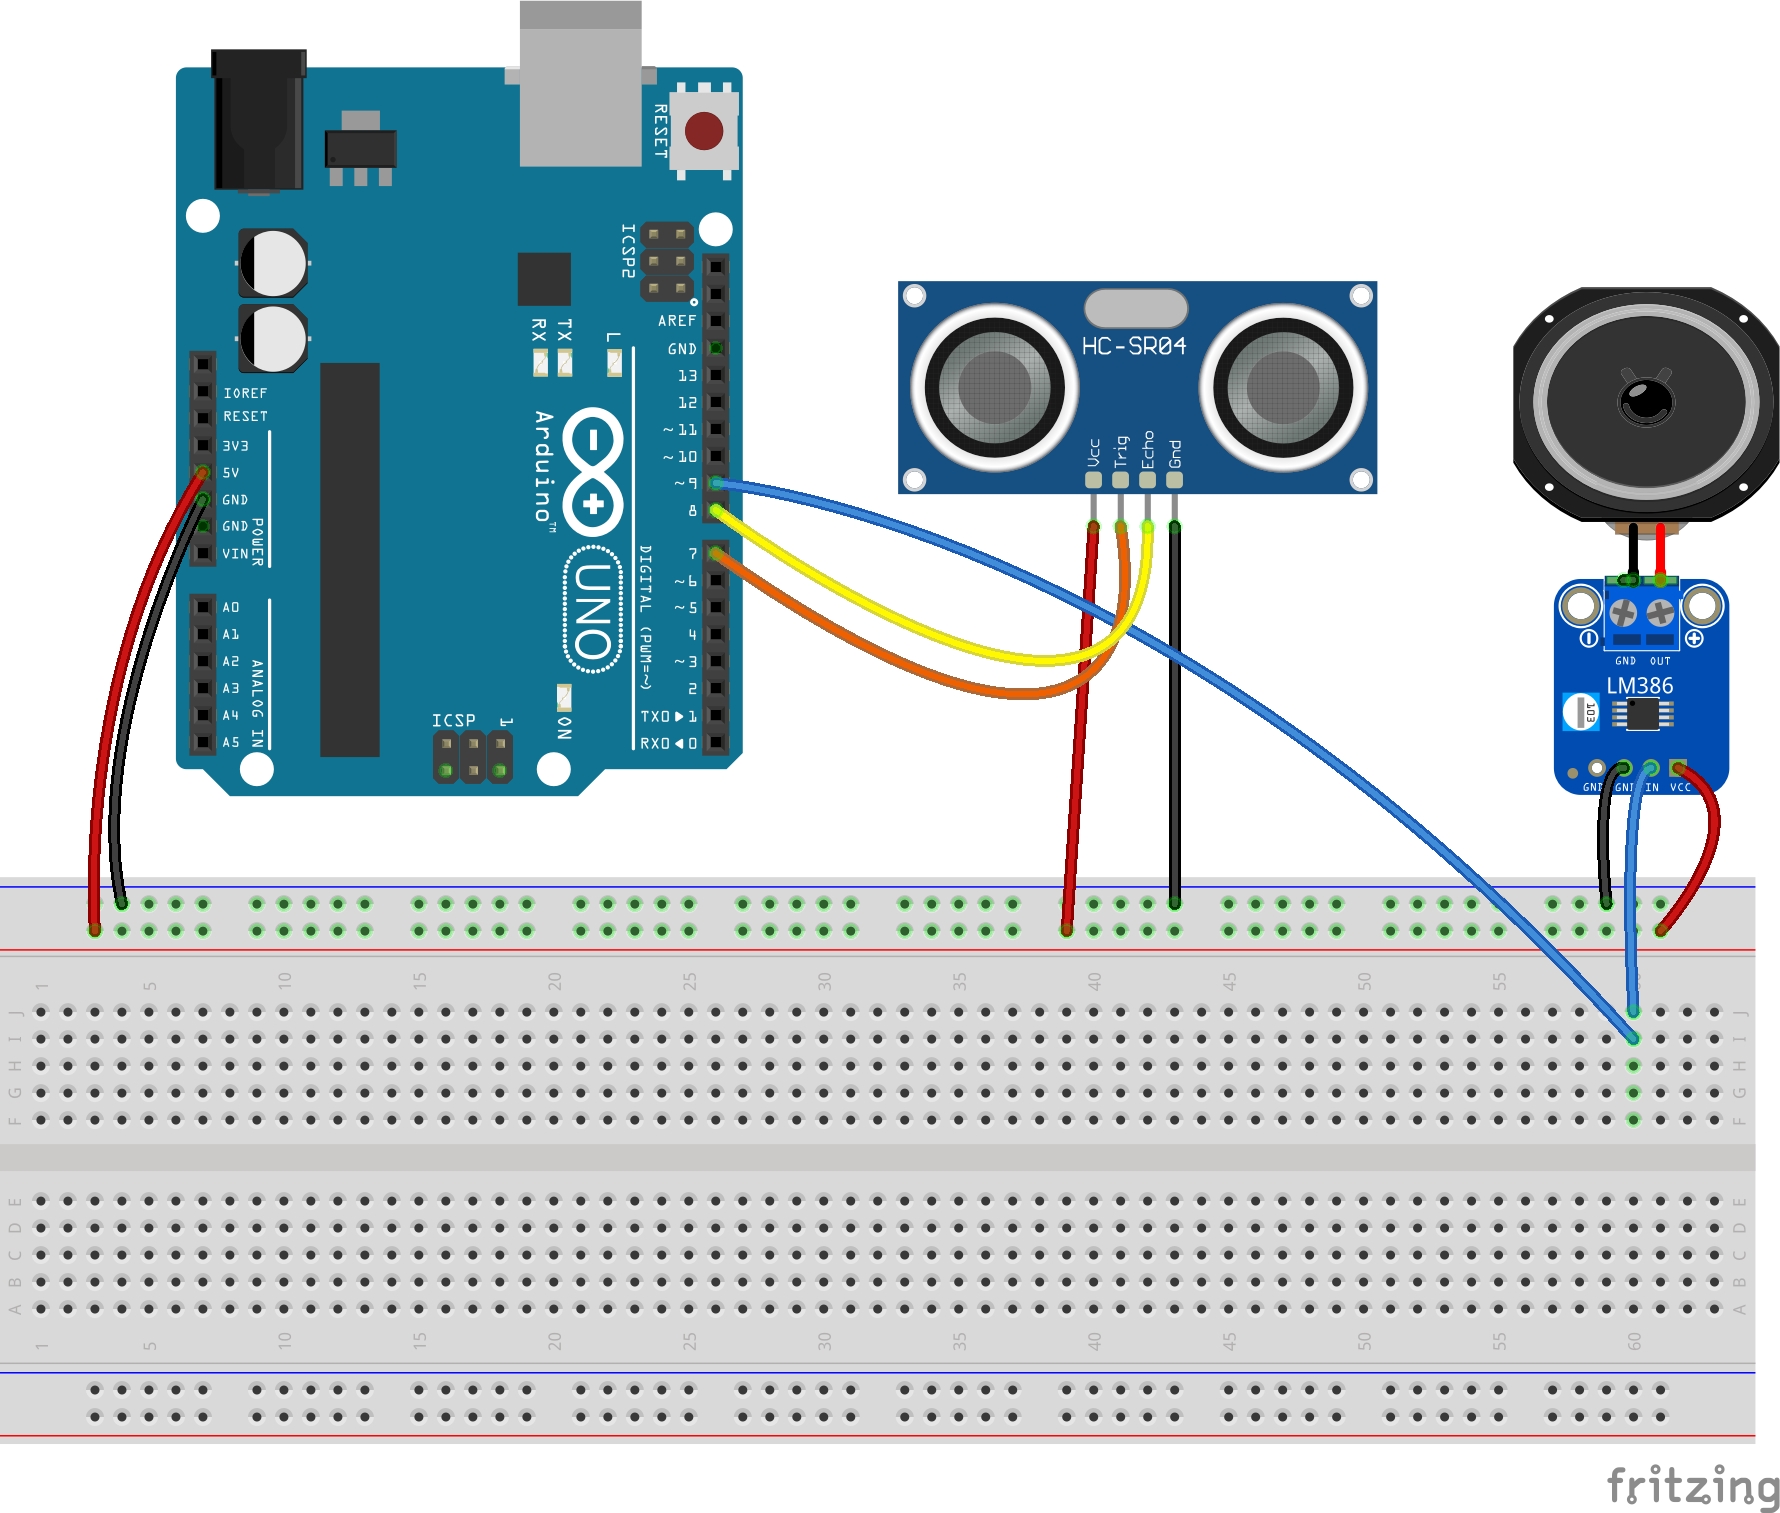
You could easily substitute the type of speaker or amplifier board. When we wire everything together, we need to make sure that the speaker is connected ONLY to the amplifier so we don't accidentally pull a ton of current on the Arduino. Here's the schematic:
Testing the ultrasonic sensor
First, I made a quick script to get the distance from the ultrasonic sensor. I'm summarizing info from another tutorial, but the ultrasonic sensor sends out a pulse on the trigger pin, and you can read how long it takes for the pulse to return. Then, the distance from the sensor to your hand is the time multiplied by the speed of sound over two (since the wave traveled there and back).
// See https://projecthub.arduino.cc/lucasfernando/ultrasonic-sensor-with-arduino-complete-guide-284faf

const int TRIG_PIN = 9;
const int ECHO_PIN = 8;
float timing = 0.0;
float distance = 0.0;
char buffer[40];

void setup() {
  pinMode(ECHO_PIN, INPUT);
  pinMode(TRIG_PIN, OUTPUT);

  digitalWrite(TRIG_PIN, LOW);

  Serial.begin(9600);
}

void loop() {
  // Send a pulse and measure the timing
  digitalWrite(TRIG_PIN, HIGH);
  delay(10);
  digitalWrite(TRIG_PIN, LOW);

  timing = pulseIn(ECHO_PIN, HIGH);
  distance = (timing * 0.034) / 2;

  Serial.print("Distance: ");
  Serial.println(distance);
}
Making the theremin sing
Now, we can set up the theremin entirely. To synthesize a sound on the speaker, we use Mozzi, which allows us to take advantage of the pulse width modulation available on pin 9.
To avoid blocking the audio synthesis, we put all of the logic in the updateControl function. We also provide a moving average for the pitch and the volume so that there isn't awkward clipping and noise in the output.
#define MOZZI_CONTROL_RATE 64
#include <Mozzi.h>
#include <Oscil.h>
#include <tables/sin2048_int8.h>
#include <RollingAverage.h>

const int TRIG_PIN = 7;
const int ECHO_PIN = 8;
const int ECHO_TIMEOUT = 6000;

const float LOW_FREQ = 220; // A3
const float HIGH_FREQ = 880; // A5
const float MAX_DIST = 50.0; // cm
const float MIN_DIST = 5.0; // cm

float timing = 0.0;
float distance = 0.0;
float freq = 0.0;
float freq_avg = 0.0;
float volume_avg = 0.0;
float volume = 0.0;

Oscil <SIN2048_NUM_CELLS, MOZZI_AUDIO_RATE> aSin(SIN2048_DATA);
RollingAverage <int, 16> kAverage_freq; // Average across 16
RollingAverage <int, 16> kAverage_vol;

void setup() {
  startMozzi();
  aSin.setFreq(LOW_FREQ);

  pinMode(ECHO_PIN, INPUT);
  pinMode(TRIG_PIN, OUTPUT);

  digitalWrite(TRIG_PIN, LOW);

  Serial.begin(115200);
}

void updateControl(){
  // Send a pulse and measure the timing
  digitalWrite(TRIG_PIN, HIGH);
  delayMicroseconds(10);
  digitalWrite(TRIG_PIN, LOW);

  timing = pulseIn(ECHO_PIN, HIGH, ECHO_TIMEOUT);
  distance = (timing * 0.0343) / 2;

  // Map onto frequencies
  float volume;
  if (distance <= MIN_DIST) {
    volume = 0.0;
  } else {
    volume = 1.0;
  }
  float freq = ((distance - MIN_DIST) / (MAX_DIST - MIN_DIST)) * (HIGH_FREQ - LOW_FREQ) + LOW_FREQ;
  freq_avg = kAverage_freq.next(freq);
  volume_avg = kAverage_vol.next(volume);

  aSin.setFreq(freq_avg);

}

AudioOutput updateAudio(){
  return MonoOutput::from8Bit(aSin.next() * volume_avg);
}

void loop() {
  audioHook();
}
Loading this onto our board, we can produce a sound! The potentiometer on the LM386 amplifier can help control the volume.
Very nice! Now, as a musician, this instrument overall is... okay. I could probably improve the synthesis - it's a bit laggy with the averages, and it's a bit sensitive when the sensor doesn't detect your hand. Stay tuned for the second design, based on capacitive sensing with an antenna!
License
The schematic was created with Fritzing. The LM386 amplifier schematic was modified from the Arduino library. Both are released under CC BY-SA 3.0.